Self-described professional tinkerer, Christopher Swenson has been making his own keyboards from scratch. Read on to see how he used the tools at the Maker Lab to bring his projects to life!
Walk into the Maker Lab in the Harold Washington Library Center, the city’s largest free maker space, and you’ll see library users making a variety of projects, from earrings to lanterns to medical prototypes for a teaching hospital.
One of the latest creative visions being brought to life? A custom mechanical keyboard! Christopher Swenson, an avid library user and a maker, walks us through his creative process.
How did this keyboard project start for you?
I’ve always liked mechanical keyboards. I got my first one when I was in college and have used them ever since. A while ago, a friend was visiting Chicago and we went to the Museum of Science and Industry. We saw an Enigma machine, which is a cipher device that was used during World War II for military communication. We thought it would be cool to try to make one. So I started the design and later thought it would be cool to be able to plug it into a computer via a USB port, like a keyboard. I did more research on how to do that and eventually ended up making several keyboards.
Tell me more about the different keyboards you’ve made.
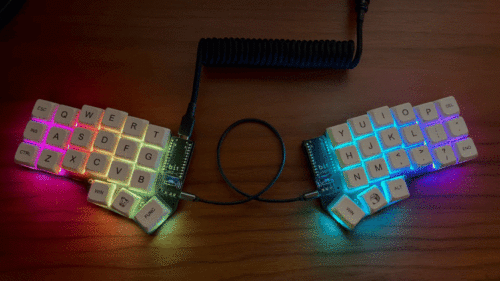
Most of the ones I’ve made so far are “40% keyboards,” which are a bit different from “normal” keyboards—for one, there are far fewer keys. The first one I made was “hand-wired,” meaning I didn’t use a printed circuit board and connected everything together with actual wires; for the rest, I used circuit boards I bought online. The second one I made is a bit quieter to type on by using fancier key switches.
Another one is a stenography keyboard, which has even fewer keys and requires you to “chord,” or press multiple keys at once, to spell things out. I don’t know much about stenography, but I’ve enjoyed playing around with it.
Where did the Maker Lab come into your process? What tools did you use?
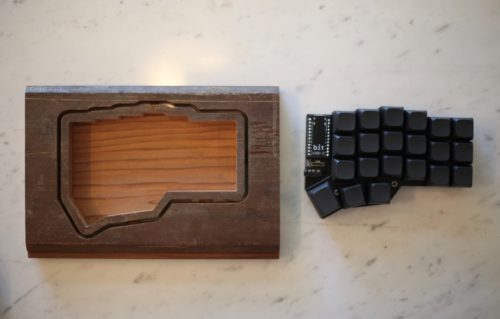
I’ve been using the Maker Lab to make cases to enclose my keyboards. I used the laser cutter and CNC router for these. The CNC router is like a 3D printer, except that it cuts out material instead of adding it.
The first case I made consists of seven layers of acrylic that have been laser cut. The bottom layer is basically a rectangle with some screw holes in it. Then there are a few layers that are just the outer edges with a hole in the middle. A couple of them have a hole in the back for the USB port. Getting up to the top you have a layer that is a rectangle with a bunch of holes for the keys to sit in.
The other case is a wood “bucket” style case. It’s basically a single piece of wood with a hole cut into it for the keyboard to sit in. I used a CNC router called “Carvy” for this one.
How long did it take you to make the cases? Were multiple trips involved?
I went to about two or three open shops! First I did a bit of prototyping; I went in with the keyboard design and cut out parts of it, took it home to see how well it would fit. I took multiple trips as a way for me to learn more about the tools, too, since I was unfamiliar with them. The Library’s Maker Lab instructors were instrumental in helping me figure things out. It was a great learning experience!
In one of your articles on your keyboards, you mentioned that Chicago Public Library having a laser cutter is another reason Chicago is amazing. Care to elaborate?
I think it’s really valuable for tools like laser cutters and CNC routers to be publicly available. I had never heard of a public library having these tools, but I think it provides a wonderful opportunity, especially for younger people, to learn about these engineering processes and build things. I think most people don’t have the financial means to own any of this equipment, so it’s great that the Library makes the tools accessible and provides a space for people to learn about them. Most people would think a project like mine is out of reach, but having these tools in a public library makes it possible.
Have you made anything else at the Maker Lab?
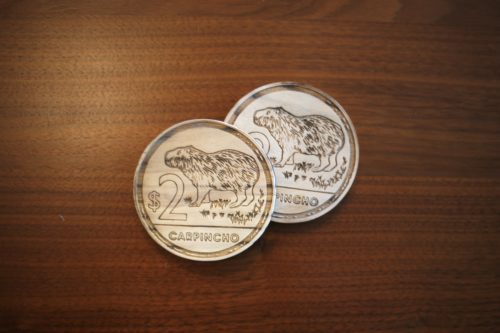
I made some coasters for a friend of mine who’s really into capybaras. It’s a replica of an Uruguay peso with a capybara on it. I found the photo online, used Adobe Illustrator to create an outline of it, and sent it to the Maker Lab email. They walked me through the process of how to cut it! It’s clear you can make a lot of things here.
Last question! What’s your Library story?
As a child, I would go to the library to casually read books or check out audiobooks. Now I have this new opportunity to use the library to make things and it’s very rewarding.
Check out the Maker Lab and all its offerings here. Special thank you to Comcast and other donors to the Library Foundation for providing Chicagoans with a space to create, learn 21st-century technology, and collaborate!